WEBSITE BUILDER SUITE
If you’re new to Virelynx, this guide will walk you through the Sites area of the platform – the central hub for creating web pages, funnels, and more. Virelynx is an all-in-one marketing platform, and the Sites section is where you build your online presence without any coding. Here you can design everything from simple websites and blogs to complex marketing funnels and even online stores.
In this introduction, we’ll explain how the Website Builder works and break down each part of the Sites area in clear, beginner-friendly terms. Whether you want to create a stunning homepage, capture leads through a funnel, start a blog, or set up a client membership portal, Virelynx has you covered. No prior experience is needed – the system provides a drag-and-drop editor and plenty of templates to make the process easy. Let’s dive into each section within the Sites tab and see what it does, why it’s useful, and how you can interact with it.
Table of Content
Site Builder Suite

The Sites section in Virelynx is the main dashboard for all your website-building tools. When you click on “Sites” in the left-hand menu of your Virelynx dashboard, you’ll enter the Website Builder hub. This area contains several sub-sections (like Funnels, Websites, Blogs, etc.) that organize the different types of online content you can create.
What is the purpose of the Sites area? It’s designed to let you build and manage all your online assets in one place. Instead of using separate platforms for your website, landing pages, online store, or blog, Virelynx’s Sites area brings these together under a unified interface. This integration means everything works seamlessly with Virelynx’s CRM and marketing tools – for example, leads captured on a page go straight into your contacts, and you can trigger automated follow-ups right away.
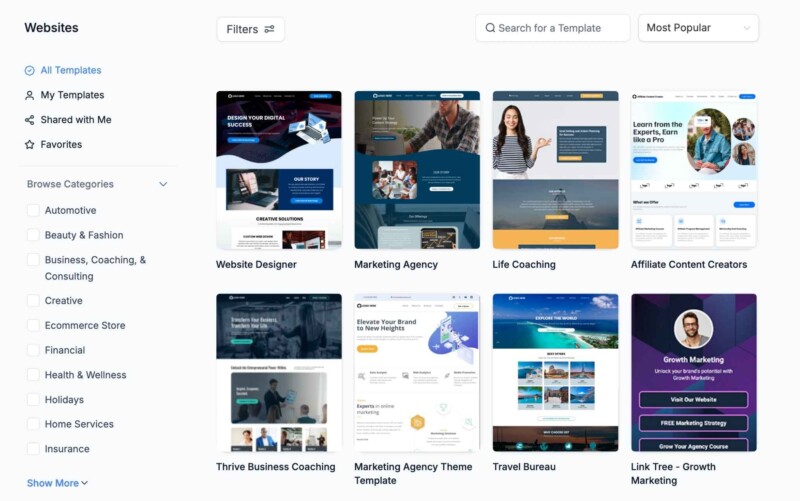
How do you use the Sites section? Typically, you’ll click into one of the sub-sections depending on what you want to create. For instance, choose Funnels to build a sales funnel, or Websites to build a full website. Each section provides a simple “New” button (e.g. New Funnel, New Website, New Store, etc.) to start creating. Virelynx will often offer you templates to start with, which you can select and then customize.
The actual page editing is done with a visual drag-and-drop editor – you can add text, images, buttons, forms, videos, and more by simply dragging elements onto the page and adjusting them. The editor lets you style your pages and sections without writing any code. You can also switch between desktop and mobile views to ensure your site looks good on all devices.
In summary, the Sites tab is your control center for building web pages. Below, we’ll go through each sub-section within Sites and explain what it is and how you’ll typically interact with it as a new user.
FUNNELS

Funnels are step-by-step sequences of web pages designed to guide visitors toward a specific goal (such as signing up for something, booking an appointment, or making a purchase). In Virelynx, the Funnels section allows you to create and manage these marketing funnels easily. A funnel usually consists of multiple pages connected in a flow – for example, a visitor might land on an opt-in page, then move to a thank-you page, and then perhaps to a sales page. Each step is meant to lead the visitor further along the conversion path.
What is a funnel used for?
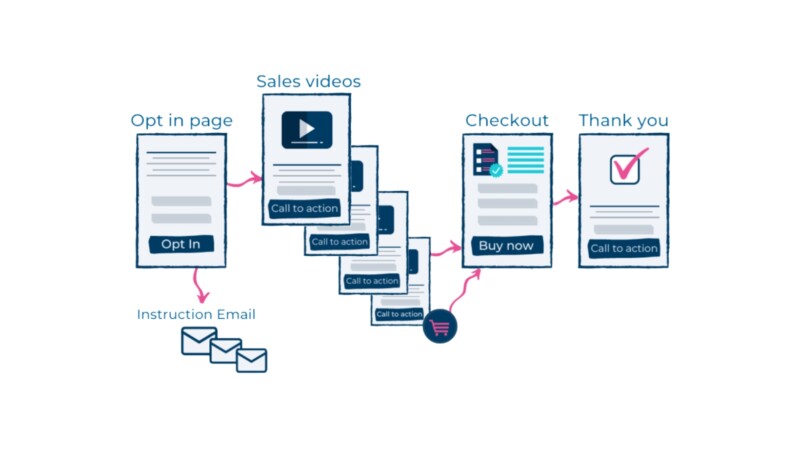
Funnels are great for focused marketing campaigns. Unlike a regular website (where a visitor can browse around to different pages freely), a funnel is more linear and keeps the visitor’s attention on one action at a time. Common use cases include: a lead capture funnel (collecting a visitor’s contact info in exchange for something like an ebook), a sales funnel (showcasing a product and then taking the customer through checkout and upsells), or a webinar funnel (registration -> confirmation -> event page, etc.). The purpose is to maximize conversions by having a clear, guided journey for your audience.
How do you interact with the Funnels section?
As a new user, you would start by clicking Funnels in the Sites tab, then hit a button like “+ New Funnel” to create one. Virelynx provides pre-built funnel templates for various goals, which is helpful if you’re not sure where to start – you can choose a template for, say, a real estate lead funnel or a product launch funnel.
If you’re not sure how to structure your funnel or don’t want to start from scratch, Virelynx offers an AI-powered funnel creation tool. This feature allows you to describe what you’re trying to achieve, for example, “I want to generate leads for a cleaning service”, and the system will automatically generate a funnel with suggested steps, layouts, and placeholder content tailored to your goal.

After creating or selecting a funnel, you’ll see a list of funnel steps (pages). You can add new steps or reorder them as needed. Each page in the funnel can be edited with the drag-and-drop page editor. For example, you can add headlines, images, forms, and videos to craft a compelling page.

Virelynx’s funnel builder also supports split testing – this means you can create two versions of a page (A/B test) to see which one performs better, a feature unique to funnels (websites don’t have built-in split testing). Once your funnel pages are designed, you can publish the funnel and share its link or assign a custom domain to it. The platform will automatically track how many visitors and conversions each step gets, so you can monitor performance (often via the Analytics section). Overall, the Funnels section is where you create guided experiences to convert visitors into leads or customers in a structured way.
WEBSITES
Websites in Virelynx are your more traditional, multi-page sites – think of things like your main business website or a portfolio site. Unlike a funnel, which is linear, a website usually allows visitors to navigate freely via menus and links. The Websites section of the builder is where you create full websites that might include a homepage, about us page, contact page, services page, etc., all linked together with a navigation menu.
What is the purpose of a website?
A website is ideal for providing comprehensive information about your business or organization. It’s usually less focused on a single conversion goal and more about giving an overall picture – for example, someone might browse your site to learn about what you offer, read your blog, and decide to contact you. Websites are great for establishing an online presence and credibility. They often serve as a hub for all your content (and might even contain funnels or link to them for specific campaigns).
How do you use the Websites section?
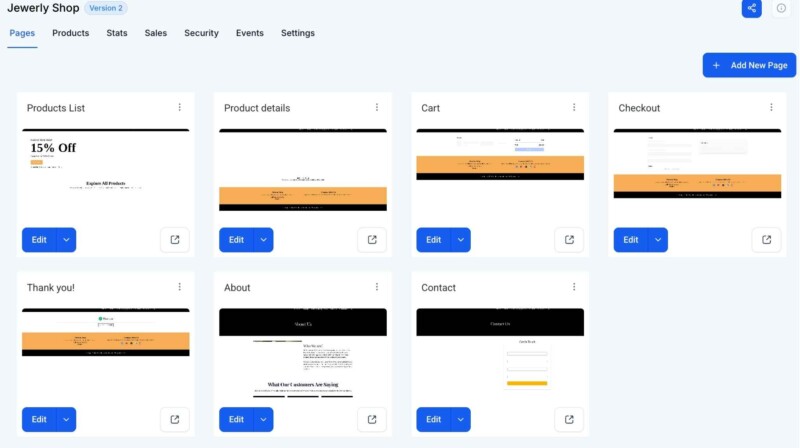
To create a website in Virelynx, you’ll click Websites under the Sites tab, then choose “+ New Website”. Just like with funnels, you’ll have the option to start from a blank canvas or pick from a library of website templates. Templates can give you a quick start with a professional layout for different industries (for example, a template for a restaurant site or a consultant’s site). Once you create a website, you can add multiple pages to it. Virelynx’s interface will show your site’s pages in a list (or sometimes as a tree structure if pages are in folders or navigation groups). You can add new pages (like “About Us” or “Pricing”) and edit each one in the drag-and-drop editor.
When editing a website page, you have the same design tools as funnels: you can drag in sections, text, images, forms, videos, and so on. One key difference is that websites allow you to set up a navigation menu so visitors can jump between pages. You’ll typically design a header and footer that persists across the site (for example, a top menu with links to the main pages, and a footer with contact info).
Virelynx lets you manage that easily – you can create a menu element and define your menu links. Another difference from funnels is that websites in Virelynx can incorporate an e-commerce store (more on Stores below), meaning if you want to have a product catalog or shopping cart on your site, that’s possible only in the Websites section (not in a funnel project).
After building your website pages and menu, you’ll publish the site, usually connecting it to your custom domain (like yourbusiness.com). From a user perspective, interacting with the Websites section is straightforward: you’re essentially building pages and linking them together. Virelynx handles the technical hosting and makes sure the site is live.
As your first website, you might create a simple homepage with information about your services and a contact form – the builder will help you do this visually. Once live, your website is accessible to visitors, and you can always come back to the Websites section to add new pages or update content as needed.
STORES

The Stores section is Virelynx’s built-in e-commerce solution. If you want to sell products or services online, whether physical items or digital goods, the Stores feature lets you set up an online store without needing a separate platform. In a nutshell, Stores allows you to create product listings, organize them into categories, and enable a shopping cart and checkout experience for your customers – all integrated into your Virelynx site.
What is the purpose of a Stores?
The purpose is to provide you with a convenient way to run an online shop as part of your website or funnel system. Instead of using external e-commerce services, you can manage everything inside Virelynx. This is useful for businesses like boutiques, coaches selling courses or e-books, restaurants selling merchandise, or really any scenario where you have items for sale on your website. The Stores feature covers the end-to-end process: displaying products, letting customers add them to a cart, and processing payments, while tying the customer data into your CRM.
How do users interact with the Stores section?
To create a store, you’ll navigate to Stores in the Sites tab and click something like “+ New Store”. You may be prompted to start from a template or a blank setup. Virelynx offers store templates which are basically pre-designed online shop layouts (with example product grids, etc.), so starting with a template can save time. Once your store is created, you’ll manage a few things: the store pages design, and the product catalogue.

Designing the store pages works with the familiar drag-and-drop editor. A store typically includes pages like a product listing (shop page), product detail pages (for each item), a cart page, and a checkout page. If you used a template, these pages will be pre-made for you to customize with your branding (you might change images, colors, and text to suit your business). You can add sections like hero banners, testimonials, or anything else to make your online store appealing.
The other side is adding your products. Virelynx provides a product management interface where you can create product entries. For each product, you’ll enter details like the name, price, description, and upload images. You can also set categories or collections to organize products (for example, “Summer Collection” or “Electronics”). If you have variations (like size or color for clothing), the system lets you add those options as well. You’ll also connect a payment gateway (such as Stripe or PayPal) so that you can accept payments securely when customers check out. This is usually done in the settings area of Virelynx (under Payments), but the Stores setup will guide you to ensure you have it configured.
After adding products and designing your store pages, your site will have a fully functional shopping cart and checkout process. A visitor can browse your products, add one or more to their cart, and go through the checkout to purchase. Their order information will be captured in Virelynx (so you can see orders and customers) and the system can even send confirmation emails or receipts with the help of workflows. As the store owner, you’ll be able to manage orders (mark them as fulfilled, etc.) and inventory (keeping track of stock if needed) all within the platform.
In summary, the Stores section transforms Virelynx into an e-commerce builder. New users will find it handy because it’s integrated: your store can live on your existing website, and customer purchases can trigger automated follow-ups or update contact records. It’s a powerful feature if you plan to sell anything online directly through the site you build on Virelynx.
WEBINARS

Virelynx’s Webinars feature allows you to host and manage webinar events through the platform. Webinars are online seminars or video presentations, often used for lead generation, workshops, or live training sessions. In the Sites area, the Webinars section is typically tied into the funnel system – essentially, it lets you create a special type of funnel specifically designed for webinars (including registration and broadcast pages and follow-up processes).
What is the purpose of the Webinars section?
The purpose is to make running a webinar campaign straightforward. If you’ve ever hosted a webinar, you know it involves several components: inviting people to register, collecting their sign-ups, reminding them to attend, providing a live or recorded video page, and then following up afterwards. Virelynx’s Webinars feature helps automate and organize these steps. It’s useful for things like live coaching sessions, product demos, or web classes. By using the built-in webinar funnels, you ensure that all your registrants’ information is captured in your CRM and that they receive timely reminder emails or texts (via Virelynx’s automation) leading up to the event.
How do you use the Webinars feature as a user? To set up a webinar, you’d go to Webinars under the Sites tab (in some versions, this might be found under Funnels as a specific type of funnel). You would create a new webinar funnel, and the system will ask whether you want an On-Demand (pre-recorded) webinar or a Live webinar.
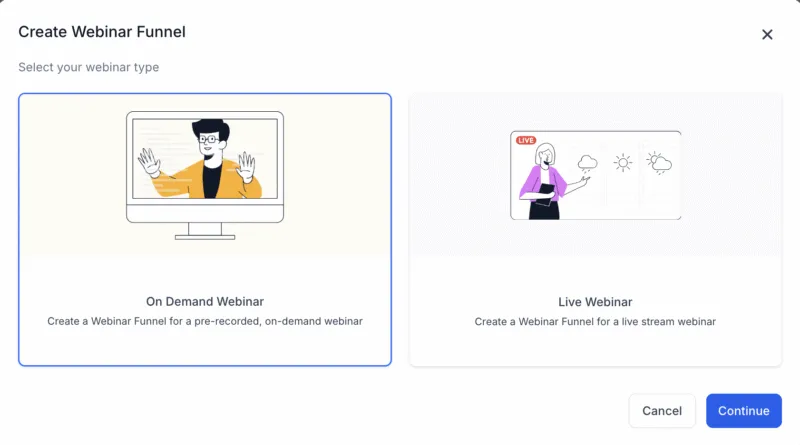
On-Demand Webinars are pre-recorded videos that people can watch at their convenience (or at scheduled times but not actually live). Virelynx would let you upload or link a video that will play for attendees.
Live Webinars are scheduled for a specific date and time. Typically, you might integrate a live streaming link (for example, a Zoom or YouTube Live link) into the webinar page so that at the time of the event, attendees can watch you live.
After choosing the type, you’ll fill in basic details like the webinar title, date and time (for live events), time zone, etc. The Webinar setup will automatically generate a sequence of pages for you:
A Registration Page – where people sign up for the webinar by entering their name, email, and any other details you want. You can customize this page with the editor (adding information about the webinar topic, speaker info, etc.). The form on this page is linked to your Virelynx contacts, so every registrant becomes a lead in your system.
A Confirmation Page – shown right after someone registers. This page thanks them for signing up and provides key details (like the date/time again, and perhaps a link or instructions on how to attend). If it’s an on-demand webinar, the confirmation page might lead them straight into watching the webinar or let them pick a viewing time.
A Broadcast Page (Webinar Room) – this is where the webinar actually takes place. For on-demand, this page would play your video when the attendee arrives. For live, this page would either embed a live stream or prompt the attendee at event time to join via the provided live link.
Virelynx provides templates for these pages, designed to suit common webinar flows, so you can just tweak the text and design to match your brand. In addition to pages, the Webinars feature includes automation recipes – basically pre-built workflows for sending reminder emails or SMS to registrants. For example, when someone registers, you might automatically send a confirmation email. Then, a day before the webinar, an email reminder might go out, and another one an hour before the start. These can be configured in Virelynx’s Automations section, but the webinar setup often has a ready-made sequence you can enable or customize (such as follow-up messages after the webinar asking for feedback or offering a product).
From a user perspective, interacting with Webinars in Virelynx means you don’t have to juggle multiple tools for registration, emailing, and hosting – it’s mostly all set up in one flow. You create the webinar funnel, edit the pages, plug in your video (or live link), and the system ties in the registration and reminders for you. When the webinar time comes (for live) you’d host it on your chosen platform (Zoom, etc.) but your attendees experience it through the Virelynx funnel pages. After the event, you can see who attended or missed (since you’ll know who registered and you can integrate tracking if they hit the broadcast page), and then you can follow up accordingly. Overall, the Webinars section helps you run engaging online events to educate or pitch to your audience, while keeping all the data centralized in your Virelynx account.
ANALYTICS
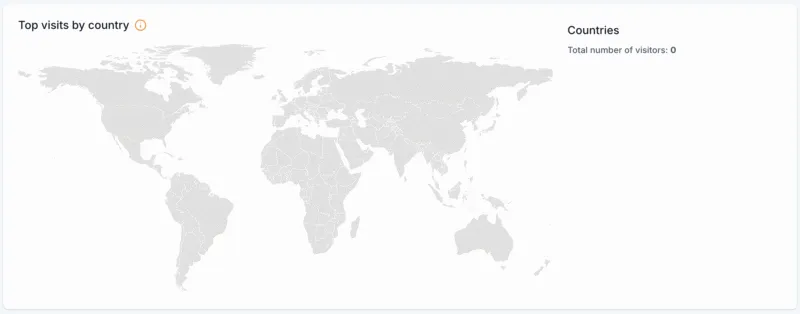
The Analytics section in the Sites area is where you can view performance statistics and data for your funnels and websites (and even for QR codes, if you use those). After you’ve built some pages – whether they are part of a funnel or a traditional website – you’ll naturally want to know how they’re performing. The Analytics section provides that insight by tracking visitor activity, conversions, and other metrics.
What is its purpose?
The purpose of Analytics is to give you a clear picture of how your pages are doing. For example, you can see how many people visited your landing page, how many of those filled out your form (conversion rate), where the visitors are coming from, and what devices or browsers they used. This information is crucial for marketing – it helps you understand what’s working and what might need improvement. If you run an ad campaign driving traffic to a funnel, the analytics will show you if those clicks are turning into leads or sales. If you have a multi-step funnel, analytics can show drop-off rates (e.g., 100 people saw Step 1, but only 50 saw Step 2 – indicating some left in between).
How do you use Analytics as a user?
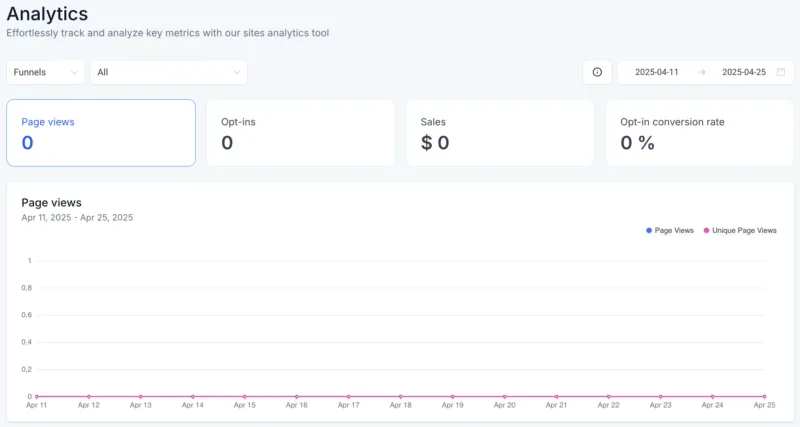
Within the Analytics section of Sites, you’ll typically select which asset you want to view data for – such as choosing a specific funnel or a specific website. Virelynx will then display a dashboard of stats for the selected item. The interface might include charts and tables. For instance, you might see a line chart of daily visitors over time, or a pie chart breakdown of traffic sources. You could see metrics like:
Visitors: The number of unique people who viewed your page(s).
Conversion Count/Rate: How many people took a desired action (like form submissions or purchases) out of the total visitors, often shown as a percentage.
Opt-ins / Sales: Depending on what your page does, it might show how many opt-ins (for funnels capturing leads) or sales (for a funnel or store selling something) occurred.
Geographical Data: You might see which countries or regions your visitors are from, especially useful if you target specific markets.
Device and Browser: Information on what browsers or devices (mobile vs desktop) people used to view your site. This can hint at whether your mobile design is important (usually yes!) or if any browser-specific issues might be happening.
QR Code Scans: If you have created QR codes through Virelynx to direct to your pages, the analytics may show you how many scans those got, since a scan leads to a page visit.
Interacting with Analytics usually involves selecting date ranges (e.g., viewing this week, last month, or a custom range of data) and possibly filtering by funnel step or page. You don’t “edit” anything here; it’s a read-only dashboard for monitoring performance. As a beginner, you might not dive deeply into analytics on day one, but as soon as your site or funnel is live and getting traffic, it’s worth checking this section. For example, if 100 people visited your signup page but only 5 signed up, that’s a 5% conversion rate – analytics data like that could prompt you to tweak your page content or form to improve sign-ups.
In summary, the Analytics section helps you answer, “How are my pages doing?” It’s a user-friendly reporting area to keep you informed about the effectiveness of your website or funnel. By regularly reviewing analytics, even a new user can make data-driven decisions to enhance their marketing efforts.
BLOG

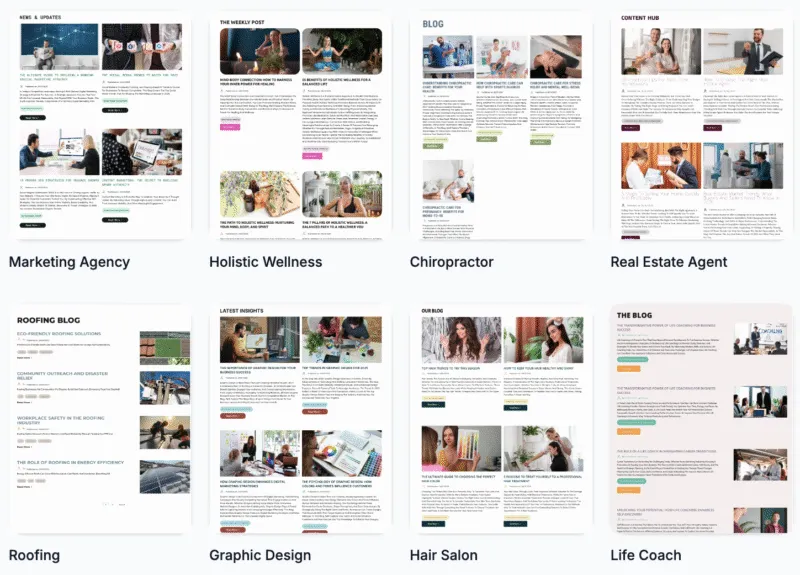
The Blogs section in Virelynx lets you create and manage a blog on your site. Blogging is a great way to regularly publish content such as news, articles, or educational posts to engage your audience and improve your website’s SEO (search engine visibility). If you want a section of your website where you can post updates or articles (like the one you’re reading now!), the Blogs feature is what you’ll use.
What is a blog in Virelynx?
It’s essentially a built-in content management system for articles. It allows you to write blog posts, format them with images and text, and then display those posts on a blog page of your website. The purpose is to keep a dynamic section of your site where fresh content can be added over time. For many businesses, a blog is used for content marketing – for example, a fitness coach might post weekly tips on exercise, or a marketing agency might publish case studies and how-to guides. These posts can attract visitors via social media shares or Google searches, and they help establish your authority in your field.
How do you use the Blogs section?

To start blogging, you’d go to Blogs in the Sites area and likely click “Create Blog” (if it’s your first time) or “New Post” to add an article. Virleynx may require you to set up a blog entity first – this typically means configuring a Blog Listing page and a Blog Post template. In simpler terms, you decide how your blog will look on your site. The Blog Listing page is the page that shows all your recent posts in a list or grid (often this is just your “Blog” page on the site with post titles, excerpts, and maybe featured images).
The Post template defines how an individual blog article page looks (with the title at the top, the content, author info, etc.). Virelynx provides default layouts which you can customize in the drag-and-drop editor, much like designing a funnel page. You might, for example, add your logo to the blog page or adjust fonts and colors to match your branding.
Once the initial setup is done, adding content is straightforward. When you click “New Post,” you’ll get an editor (sometimes a rich text editor) where you can write your article. You can type in your content, insert images or videos, format headings and bullet points – basically everything you need to create a well-structured article. You can also set details like the post title, author name, publish date, and possibly tags or categories if you want to categorize your blog posts.
After writing a post, you’ll publish it, and it will appear on your blog page for visitors to read. Over time, as you add more posts, your Blog section in Virelynx will show a list of all posts you’ve created. You can edit old posts or unpublish them if needed. For navigation, you might add a link to your main website menu that points to your Blog page, so visitors can find your articles easily.
For new users, the Blogs feature is an easy way to start content marketing. It’s integrated, meaning you don’t have to set up a separate WordPress site (unless you want to – which we’ll cover next) to have a functioning blog. Everything is within the Virelynx environment, so your blog posts can include forms or CTA buttons that tie directly into your CRM and funnels. One thing to note: while the built-in blog is convenient, some users with very advanced blogging needs might still use the WordPress integration. But for most beginners, the Blogs section in Virelynx is more than capable of hosting a professional-looking blog that’s simple to maintain.
WORDPRESS
Virelynx also offers a WordPress integration, which might seem a bit confusing at first – after all, we just talked about the built-in Blogs feature. Essentially, this section is for those who prefer to use WordPress (a very popular website and blogging platform) within their Virelynx account. Virelynx’s WordPress integration allows you to host WordPress websites or blogs on Virelynx’s infrastructure and manage some of the WordPress settings from the Virelynx dashboard.
What is the purpose of the WordPress section?
The purpose is to give you flexibility and power. WordPress has a huge ecosystem of plugins and themes and is widely used for blogging and complex websites. If you have an existing WordPress site or you need specific functionalities that only WordPress plugins provide, you can use this integration. For instance, maybe you have a detailed blog with dozens of posts on WordPress, and you’re moving to Virelynx – you might choose to bring your WordPress site over instead of rebuilding all those posts in the Virelynx blog system. Or perhaps you just love using WordPress’s editor and tools; this integration means you don’t have to give that up. It’s basically Virelynx saying: “We have our own website/blog builder, but if you want WordPress, we support that too.”
How do users interact with WordPress in Virelynx?
In the WordPress section of the Sites tab, you can usually create and manage WordPress installations for your account. For a new user to set this up, you would click something like “+ Create WordPress Site”. You might need to go through an activation step (sometimes this feature could be an add-on that you enable). Once activated, Virelynx will provision a WordPress instance for you – essentially setting up the backend so you have a fresh WordPress site to work with.

You will then be able to set a domain or subdomain for this WordPress site (for example, blog.yoursite.com or any domain you own). Virelynx often provides a one-click login or single sign-on to WordPress, meaning from your Virelynx dashboard you can click “Go to WordPress Admin” and it logs you in automatically, so you don’t have to remember a separate WordPress username/password. This is a nice convenience to manage things.
Once inside WordPress (the familiar WP Admin dashboard), you operate it like a normal WordPress site: install themes or plugins if needed, create posts or pages, etc. Essentially, you get the best of both worlds – WordPress’s flexibility and Virelynx’s integrations. For example, you could use a WordPress plugin for some special form or SEO feature and still capture leads into the Virelynx CRM via integration or forms.
For a beginner, it’s worth noting that using the WordPress section is optional. If you’re not already comfortable with WordPress, you can absolutely stick to Funnels and Websites and Blogs within Virelynx itself. The native builder will cover most needs. The WordPress feature is there if you specifically want it or are migrating an existing site. Interaction wise, after setup, you’ll mostly work in the WordPress interface for editing content, but you’ll manage settings (like creating the site, deleting it, or accessing it) from the Virelynx Sites > WordPress area.
In summary, the WordPress section allows Virelynx users to run WordPress sites within the platform. It’s purpose-built for those who need the advanced features of WordPress or have pre-existing WordPress sites. As a new user, you can skip this until you have a reason to use WordPress; otherwise, it’s there to ensure you’re not limited – you have the freedom to choose the web building tool that best fits your needs while still keeping everything under one roof.
CLIENT PORTAL

The Client Portal is an exciting part of Virelynx’s Sites area that provides a secure, login-based area for your clients or customers. It’s essentially a members area or dashboard for end-users (your clients, students, or leads) to interact with content or data you provide them. If you’re coming from other platforms, you might think of it as a membership site or a client dashboard. Virelynx’s Client Portal is designed to let you offer things like online courses, membership content, or even affiliate/referral dashboards, all branded as your own.
What is the purpose of the Client Portal?
The Client Portal serves as a unified place where your clients can log in and access various resources or account information related to your business. For example, if you sell an online course or have a training program, you can host your course inside the Client Portal – your customers (students) would log in to the portal to watch videos and track their progress. If you run an affiliate program, your affiliates could log in to see their referrals and commissions. If you manage projects for clients, you might even use the portal to share reports or documents. Essentially, it’s a private area for each client that you control, as opposed to the public-facing pages (funnels, websites) which are available to everyone.
How do you use the Client Portal as a Virelynx user?
To set it up, you’ll go to Client Portal in the Sites tab. The first steps usually involve configuring the portal for your business. This includes things like:
Custom Domain: By default, client portals might be on a generic Virelynx domain (for instance, something like yourbusiness.clientclub.net), but you can set up a custom domain so it looks like app.yourbusiness.com, giving a branded experience.
Branding and Appearance: You can upload your logo, set colors, and maybe a cover image or login page design so that the portal matches your brand identity.
Enabling Features: Virelynx’s client portal can aggregate several features. Currently, it often ties together membership courses, communities and affiliates. So you might specify which ones you’ll be using. For many new users, the main use will be for membership/course content. You’d enable the membership feature (if you have created courses under another section of Virelynx – formerly the “Memberships” or now via Client Portal, you create course content like modules and lessons).
Once the portal settings are in place, you’ll start inviting clients or users to it. For instance, if someone purchases your course via a funnel on your site, you can automatically create a portal login for them (Virelynx can send them a sign-up email). Alternatively, you can manually invite clients by email. Each client will have their own login (email and password) to access the portal.

From the end-user’s perspective (your client), the portal is where they sign in to see whatever you’ve allowed. If it’s a course, upon login they see their course dashboard, can click into lessons, mark them complete, etc. If it’s an affiliate portal, they might see their unique referral link and stats. If you set up a community or other resources, they’d access those here too. The experience is akin to logging into a website specifically meant for them.
As the business owner (Virelynx user), interacting with the Client Portal means managing the content and user access. You’ll be adding course materials or enabling affiliate systems in the background (Virelynx has a Membership/Course builder where you upload videos, write lesson text, etc., and tie that to the portal). You don’t necessarily design pages here like you do with funnels; instead, you configure sections of the portal. For example, you might set your course outline: Course has Module 1, Module 2, etc., and fill in the content. The portal automatically creates a user interface for it.
The purpose of all this is to increase value and engagement: by giving clients a place to log in, you foster a sense of community and professionalism. They can self-serve information (like downloading their resources, checking progress, etc.) without always emailing you. It also helps you keep things organized – only those who should access content can, and it’s all in a secure environment.
In summary, the Client Portal is where Virelynx helps you deliver protected content or dashboards to your clients. If you’re a beginner, you might not use this on day one unless you have an immediate need (like you’ve promised an online course to customers). But it’s good to know it’s there. Over time, as your business grows, you might introduce a client portal to host VIP content, courses, or give clients a login to see project updates. Virelynx makes this advanced capability available out-of-the-box, and it’s integrated with everything else (for example, a form on your site could sign someone up and then grant them portal access automatically). The tone and complexity of using it is a bit more setup-heavy than a simple page, but the platform provides guidance and templates to help you configure your own portal easily.
FORMS
Forms are a fundamental piece of any website or funnel, and in Virelynx, the Forms section allows you to create custom forms to collect information from your visitors. A form could be as simple as a contact form (Name, Email, Message) or as complex as a multi-field survey or registration form. Essentially, whenever you need to gather data (like lead details, feedback, appointment requests, etc.), you’ll likely use a form.
What is the purpose of the Forms section?
Its purpose is to give you a flexible form builder so you can capture leads or any input and have that data flow into Virelynx’s CRM. For example, if you have a landing page offering a free consultation, you’d use a form to gather the visitor’s name, phone number, and maybe some notes about what they need. The form, once submitted, creates a contact entry in Virelynx (or updates an existing contact) with those details. You can then respond or kick off an automated workflow (like sending an email thank-you or alerting your team). Forms are one of the primary ways anonymous visitors become known leads in your system.
How do you use the Forms builder?
Under the Forms section in Sites, you’ll click something like “Create New Form”. This opens up Virelynx's form editor. The interface is generally drag-and-drop or click-to-add: you will see a list of form field types you can include, such as:
Standard Fields: Name, Email, Phone, etc. (Virelynx will likely have these ready as common fields).
Custom Fields: If you have custom information you want (like “Budget Range” or “Favorite Color”), you can create custom fields in your CRM settings and then add them to your form.
Other Elements: Perhaps a section divider, text paragraphs (to add instructions in the form), checkboxes, radio buttons, dropdown menus for selection questions, date pickers, file upload, etc.

You design the form by adding the fields you need in the order you want them. You can also adjust basic settings like making a field required (the user must fill it before submitting) or changing the placeholder text. There’s also an option to customize the submit button text (e.g., “Submit”, “Get My Quote”, “Join Now” – whatever fits your context).
Once the form is built, you save it and it becomes available to use on your pages. How do you actually put the form on a funnel or website page? Virelynx makes this easy: in the page editor, there’s usually a “Form” element you can drag onto the page, and then you select which of your forms to embed. Alternatively, each form you create also gets a direct link and an embed code. This means you could even use the form outside of Virelynx pages – for instance, embed it on a WordPress site or just share the form’s link if you wanted a standalone form page.
For a new user, a common scenario is:
Go to Forms, create a form asking for some info (let’s say, a newsletter signup form asking for Name and Email).
Save it as “Newsletter Form”.
Go to your website or funnel page where you want that form – drag the Form element, and choose “Newsletter Form” from the list.
Now that form appears on your page. When someone fills it out on the live site and clicks submit, their data is captured.
After submission, where does the data go? In Virelynx, form submissions create/update Contacts in your CRM. You can view individual form submissions as well (there is a Submissions tab usually, where you can see a list of all entries for each form). If, for example, you asked a question like “What is your preferred appointment date?”, that info will be attached to the contact or at least viewable in the submission record.
Moreover, you can set up automations (workflows) triggered by form submissions. For instance, if someone fills out a form, you can have Virelynx automatically send an email reply, or notify your team via internal notification, or add the contact to a campaign. This is beyond the form itself, but it’s one of the powerful integrations that the form enables.
In short, the Forms section is your go-to tool for building any kind of form to gather user input on your site. It’s user-friendly and doesn’t require technical skills. As a beginner, you might create a simple contact form or lead magnet signup form first. As you get comfortable, you can make longer forms or even creative ones (like contest entry forms, application forms, etc.). These forms ensure you capture the data you need and automatically funnel it into your database for follow-up. Always test your forms after building (Virelynx allows you to preview them) to make sure they look right and that you receive the submissions in your CRM.
Virelynx is the apex automation engine, purpose-built for growth-driven entrepreneurs, marketers, and agencies who demand efficiency without compromise. By fusing CRM precision with agile automation, it streamlines every moving part of your business, from lead capture to client retention.
© 2025 Virelynx All Rights Reserved.