
CRM & PIPELINE MANAGEMENT
Welcome to a complete guide on Virelynx's CRM and Pipeline Management System! If you’re here, you’ve likely heard about how this tool can revolutionize the way you manage leads and track your sales process. This guide will walk you through everything you need to know to get the most out of Virelynx's opportunities and pipeline features.
What Are Opportunities in Virelynx?
In Virelynx, an opportunity represents a prospect or lead in your sales process. It is a contact that you are actively engaging with, nurturing, and moving through various stages of your sales pipeline.
Think of opportunities as individual tiles in your sales journey. Each opportunity holds essential information about your prospect, including contact details, status, and potential revenue. Managing opportunities effectively ensures that no lead falls through the cracks and helps your team stay on top of every interaction.
Understanding the Pipeline Management System
The pipeline management system in Virelynx is a visual representation of your sales process, broken down into stages. It allows you to track your leads’ progress from their initial interaction with your business to becoming paying clients. Here’s a breakdown of a typical sales pipeline:
New Leads – Fresh leads who have just entered your system.
Responded – Leads who have replied to your emails, messages, or calls.
Booked a Call – Prospects who have scheduled a meeting or consultation.
Under Contract – Leads who have agreed to your offer but are yet to complete the transaction.
Became a Client – Prospects who have made a purchase or signed a contract.
Ghosted – Leads who stopped responding or declined your offer.
Each stage reflects the status of your prospects and helps you visualize your sales funnel at a glance.
Step-by-Step Guide:
Creating Pipelines in Virelynx
Follow these steps to set up your pipeline in Virelynx:
1. Navigate to Pipelines
Go to your Virelynx account.
Click on Opportunities in the left-hand menu.
From the top navigation bar, click on Pipelines.
2. Create a New Pipeline
Click on the New Pipeline button.
Enter a name for your pipeline (e.g., “Sales Pipeline”).
Add your desired stages by clicking on Add Stage.
3. Define Pipeline Stages
Stage Name
New Lead
Responded
Booked a Call
Under Contract
Became a Client
Ghosted
Description
Initial contact with the prospect.
Lead has replied to your outreach.
Lead has scheduled a consultation call.
Lead has agreed to your offer.
Lead has completed the transaction.
Lead stopped responding.
Once you’ve added all stages, click Save.
4. Adjust Stage Settings
Each stage can be customized with specific settings:
Rotten Duration: Set a time frame for how long a lead can stay in a stage before being flagged as “rotten.”
Automation Triggers: Connect automation workflows to move leads automatically between stages.
5. Manage Opportunities within the Pipeline
Once your pipeline is created, you can start adding opportunities manually or automatically through automation workflows.
Manual Entry: Click on Create Opportunity and fill in the necessary details.
Automation: Use workflows to automatically create opportunities based on triggers like form submissions or call status changes.
How to Add Opportunities
There are three ways to add opportunities to your pipeline:
1. Manual Entry
Go to the Opportunities tab.
Click on Create Opportunity.
Fill in the details such as contact name, email, phone number, opportunity name, and stage.
Assign the opportunity to a pipeline and save it.
2. Automatic Entry via Workflows
Automating the creation of opportunities saves time and ensures consistency in your sales process. Here’s how to set it up:
Go to the Automation tab.
Create a new workflow and name it (e.g., “Contact Us Form Submission”).
Set the Trigger as Form Submitted and select a specific form (e.g., Contact Us).
Set the Action as Create or Update Opportunity.
Choose the pipeline and stage where the opportunity will be placed (e.g., New Leads).
Define additional fields such as contact name, status (Open), and opportunity value.
Save and publish the workflow.
3. Bulk Import
If you have a large list of contacts, you can upload them via a CSV file:
Go to Contacts and click on Import Contacts.
Upload your CSV file.
Use automations to add the imported contacts to your pipeline as opportunities.
This method is useful when migrating from another CRM or when handling large data sets.
Opportunity Statuses Explained
Each opportunity can have one of four statuses:
Open – The lead is actively being nurtured.
Won – The lead has converted into a paying client.
Lost – The lead declined your offer.
Abandoned – The lead has gone cold and is no longer responding.
Updating the status helps you keep track of your leads’ journey and ensures your pipeline stays organized.
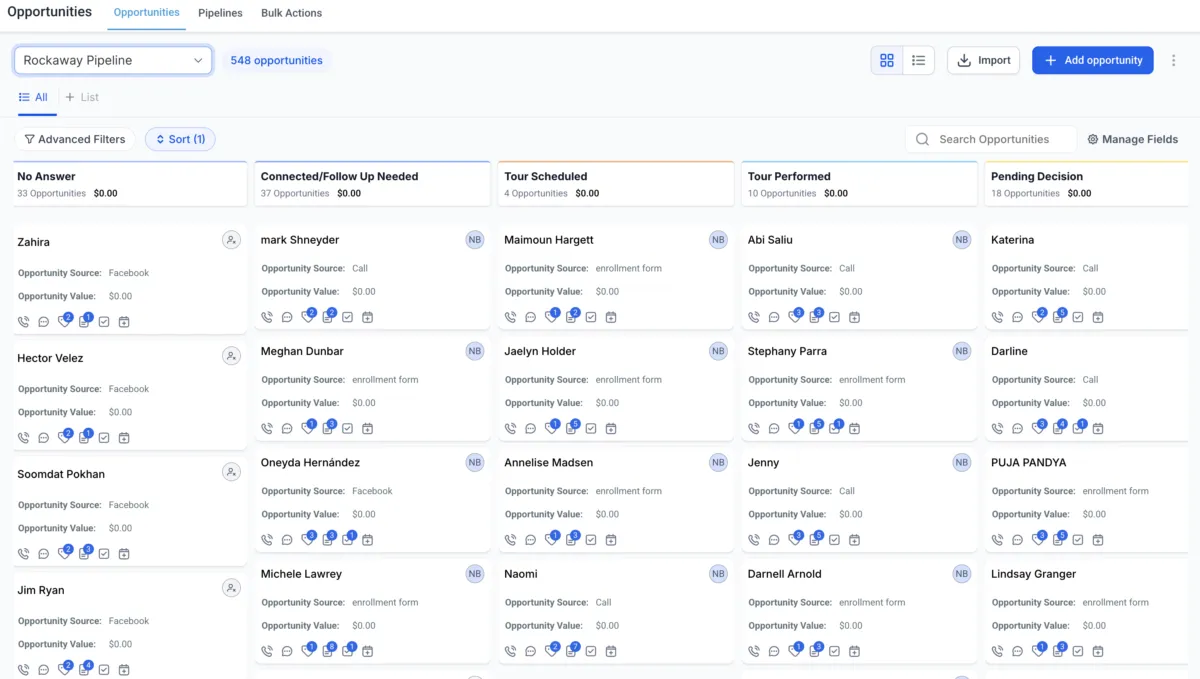
The Value of Opportunity Tiles

Opportunity tiles in Virelynx provide a snapshot of each lead’s status, potential value, and interactions. They are highly interactive and come with various icons that allow you to take quick actions directly from the tile. Let’s break down what each icon means and how it can be used:
Icon Breakdown
Call Icon – Clicking this icon allows you to initiate a phone call with the lead directly from the opportunity tile.
Chat Icon – This opens the conversation history with the lead, allowing you to see previous interactions or start a new message.
Tag Icon – Use this icon to add or manage tags associated with the opportunity. Tags help categorize and organize your leads.
Note Icon – Clicking the note icon allows you to add notes about the lead. Notes can be used to document important details, such as follow-up dates or specific client needs.
Task Icon – This icon is used to assign tasks related to the opportunity. For example, you can set a reminder to follow up with the lead or schedule a meeting.
Calendar Icon – The calendar icon shows any upcoming confirmed appointments with the lead. Clicking on it allows you to view and manage these appointments.
These icons streamline your workflow by making key functions accessible right from the opportunity tile, helping you save time and stay organized.
Advanced Automation with Triggers
Virelynx’s automation capabilities go beyond form submissions. You can create opportunities based on various triggers:
Inbound Webhooks – Connect third-party tools to Virelynx.
Call Status – Create opportunities based on call outcomes.
Survey Submitted – Automatically add leads after a survey is completed.
Trigger Link Clicked – Track and act on link clicks.
Automations help streamline your sales process and reduce manual tasks, allowing your team to focus on closing deals.
What Types of Businesses Benefit from Virelynx?
Virelynx’s pipeline management system is a valuable tool for businesses across various industries, especially those that rely heavily on lead generation and sales processes. Here are some examples of businesses that can benefit from using this tool:
Digital Marketing Agencies – Manage client acquisition, nurture leads, and track client progress.
Real Estate Agencies – Track potential buyers and sellers through various stages of the sales process.
Consulting Firms – Manage prospective clients from initial inquiry to signed contract.
Medical Practices – Handle patient inquiries, appointment bookings, and follow-ups.
Home Improvement Companies – Track leads from initial contact to project completion.
Example: A Roofing Company
Imagine a roofing company that receives dozens of inquiries each week. With Virelynx, they can manage their leads more effectively by creating a pipeline with the following stages:
New Lead – Initial inquiry from a potential client.
Inspection Scheduled – The lead has scheduled a roof inspection.
Quote Sent – The company has sent a quote to the lead.
Under Contract – The lead has accepted the quote and signed the contract.
Job Completed – The roofing project has been completed.
Follow-Up – The company checks in with the client after project completion.
The roofing company can automatically move leads between stages based on actions such as form submissions or email replies. This streamlines their sales process and ensures that no leads are forgotten.
Why Use Virelynx for Pipeline Management?
Virelynx’s pipeline management system offers several benefits:
Centralized Data – Keep all your leads and prospects in one place.
Visual Sales Process – Easily track and manage your sales funnel.
Automation – Reduce manual tasks and improve efficiency.
Customizable Stages – Tailor the pipeline to your unique business needs.
Mastering CRM and pipeline management in Virelynx can significantly improve your business’s sales process. By understanding how to set up pipelines, add opportunities, and automate workflows, you can ensure that no lead is left behind and that your team works smarter, not harder.
Whether you’re a small business owner or part of a large team, Virelynx’s powerful features will help you nurture leads, close deals, and grow your business efficiently.
So, start implementing these strategies in your Virelynx account today and see the difference it makes in your sales performance!

Virelynx is the apex automation engine, purpose-built for growth-driven entrepreneurs, marketers, and agencies who demand efficiency without compromise. By fusing CRM precision with agile automation, it streamlines every moving part of your business, from lead capture to client retention.
© 2025 Virelynx All Rights Reserved.